
Applies to
Platform: Fabric Lakehouse
Deploy the generated artifacts of a Fabric Lakehouse project with Target Platform Azure Synapse. You upload the notebooks to the Synapse workspace and run the notebook <project>_deploy, which creates the load control and the databases, tables and views of every layer. Afterwards the solution is ready to load.
The artifacts for Azure Synapse contain no deploy.ps1. For Target Platform Fabric, see Fabric Lakehouse - Deployment.
Prerequisites
- The Azure Synapse target environment is prepared, and the Synapse workspace is connected to an Azure DevOps Git repository.
- The artifacts are generated and downloaded.
- The placeholders are replaced with the placeholder values for Azure Synapse, including the database name and path of the load control.
Upload the artifacts
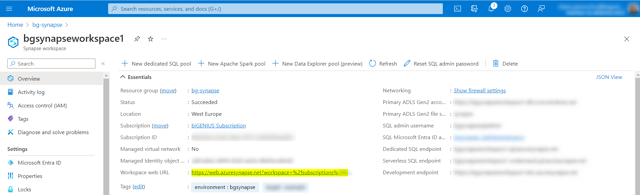
- In Azure, open the Synapse workspace and select its Workspace web URL. Synapse Studio opens.
- Select Develop.
- If Synapse Studio is in live mode, switch to Azure DevOps Git mode. Create a working branch, for example
demo_synapse.
- Create a folder, for example
Artifacts, and import the notebook<project>_deployand all notebooks of the foldersHelpers,JupyterandLoadControl.
- Select Commit all. Then create a pull request from your branch to the collaboration branch and complete it.

- Switch to the collaboration branch and select Publish.

Deploy the artifacts
- In Develop, open the notebook
<project>_deploy.With the default Deployment Options, Generate Drop Table Statements is selected. Each deployment replaces every generated table and the load control log tables, which deletes their data. Before you deploy to a target that holds data, clear Generate Drop Table Statements in Project Settings and generate the artifacts again.
- Attach the notebook to
<Spark pool>.
- Select Run all. The first cell runs
<project>_deploy_loadcontrol, the second runs<project>_Deployment, which runs<project>_deploy_1to<project>_deploy_<number>.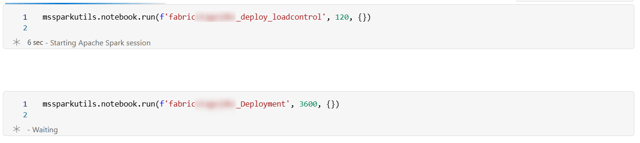
Check the result
Both cells end without an error. In Azure Storage Explorer, the target container holds a folder per database, and each table folder holds a _delta_log folder:


Example
A DataVault and Mart project has the load control database loadcontrol with the path abfss://docu-datalake@<storage account>.dfs.core.windows.net/loadcontrol/. After the replacement, the load control notebook starts with:
CREATE DATABASE IF NOT EXISTS `loadcontrol` LOCATION
  'abfss://docu-datalake@<storage account>.dfs.core.windows.net/
  loadcontrol/'
Line breaks are added here. It then creates `loadcontrol`.`execution_log` and `loadcontrol`.`deployment_log`. The tables of the Raw Vault are created in the database rawvault, for example `rawvault`.`rdv_hub_item`.
Redeploy and keep data
- In Project Settings, clear
Generate Drop Table Statementsin Deployment Options. - Generate, download and replace the placeholders with the same values, upload the notebooks and run
<project>_deploy.
The notebooks then create tables and log tables with CREATE TABLE IF NOT EXISTS and insert missing unknown-member rows only. Views are created with CREATE OR REPLACE VIEW. Column changes are not applied to existing tables.
Change the target folder
CREATE DATABASE IF NOT EXISTS keeps an existing database at its old path. To move the databases of a project to a new path, drop them first, in a notebook, once per database:
DROP DATABASE ... CASCADE deletes every table in the database, including tables of other projects that use the same database name. With Target Platform Azure Synapse, every project uses its layer names, for example stage or rawvault, as database names by default.
%%pyspark
spark.sql("DROP DATABASE IF EXISTS <database name> CASCADE")
Then replace the placeholders with the new database_directory values and deploy again.
Failure symptoms and recovery
Some deployment notebooks failed
Message: <number> of <number> deployment files terminated with errors
Cause: A deployment notebook failed. <project>_Deployment runs the other notebooks and reports the failures at the end.
Fix: Open the failed notebook run, correct the cause and run <project>_deploy again.
For failures in other steps, see Troubleshoot generation, deployment and load failures.
Release differences
Legacy manual deployment
Up to Generator 1.9, the artifacts had no notebook <project>_deploy. You ran the notebook Jupyter\<project>_Deployment from a notebook of your own with %run.
Legacy loadcontrol database
Generator 1.9 and 1.10 did not create the load control database. Create it in a notebook before the deployment:
%%pyspark
spark.sql("CREATE DATABASE IF NOT EXISTS <database name>
  LOCATION '<path>'")
Related articles
- Previous: Azure Synapse - Target environment, Generate artifacts, Download generated artifacts, Replace the placeholders in the artifacts
- Next: Azure Synapse - Load data - Native Load Control, Fabric Lakehouse - Load data - Apache Airflow Load Control
- Reference: Fabric Lakehouse - Placeholder values, Deployment Options (Project), Target Platform (Project)
- See also: Fabric Lakehouse - Artifacts, Fabric Lakehouse - Deployment, Troubleshoot generation, deployment and load failures