This article proposes a possible target environment on Databricks for the Stage JDBC generator.
Installation and configuration of the target environment are not part of biGENIUS support.
Unfortunately, we won't be able to provide any help beyond this example in this article.
Many other configurations and installations are possible for a Databricks target environment.
Below is a possible target environment setup for the Databricks Stage JDBC generator using the Hive catalog.
The Unity Catalog Property must be set to false:
![]()
Setup environment
The Databricks target environment needs at least the following Azure resources set in your Azure Subscription:
- A Ressource Group: some help is available here
- Inside the Ressource Group:
In the following example of the target environment, we will use the following resources:
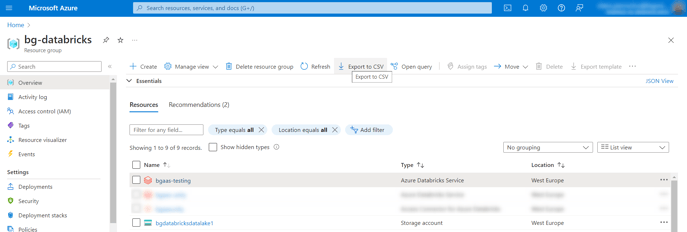
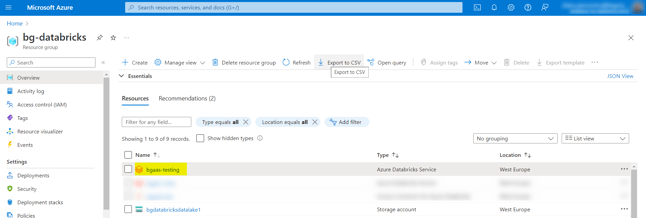
- A Ressource Group named bg-databricks
- A Storage Account for our Target Data Lake named bgdatabricksdatalake1
- An Azure Databricks Service named bgaas-testing
Tools to install
Please install the following tools:
- Azure Storage Explorer: available here
Source data
The source data are coming from a JDBC source.
In this example, we will use a Microsoft SQL Server database stored in Azure in a dedicated resource group:

The Azure database is AdventureWorks2019 and contains the data from the SQL Server sample database AdventureWorks2019.
To be able to access the Microsoft SQL Server from Databricks, you should check the box Allow Azure services and resources to access this server in the Server Networking configuration:
Target Storage Account
We have chosen to create a folder named docu-datalake in our Target Storage Account:
- Open Azure Storage Explorer
- Connect to your Subscription
- Open the Target Storage Account
- Create a folder
For this example, we have 1 Target folder for our Data Lake:

Upload Artifacts in Databricks
As your source was not a file, you should add the source schema name before the source Model Object Name in biGENIUS-X, Dataflow Modeling overview.
Transform CreditCard in Sales.CreditCard, for example.
Please now upload the generated Artifacts from the biGENIUS-X application to the Databricks Workspace.
Please replace the placeholders before uploading the artifacts.
- Click on the Azure Databricks Service in Azure:
- Then click on the URL:

- Databricks is opened:

- Click on the Workspace menu on the left-hand-side:

- Expand the folders Workspace > Users and click on your user:

- We have chosen to create a folder named Artifacts:

- Import all the generated artifacts from the folder Jupyter, Helpers, and LoadControl:

It is possible to have one or several files not imported as:

It is due to Databricks itself.
Just restart the import for the relevant files, and it should work.
- Import, in addition, the following helper:
In the file 500_Deploy_and_Load_DataVault_Databricks.ipynb, adapt the name of the XXX_Deployment.ipynb, the XXX_SimpleLoadexecution.ipynb, the XXX_MultithreadingLoadExecution.ipynb, and the XXX_SelectResults.ipynb by the name of your Helper files.
Create a Compute Cluster
To be able to execute the Notebooks from our generated artifacts, please create a Compute Cluster in Databricks:
- Click on the Compute menu on the left-hand-side:

- Click on the Create compute button:

- Change the following information:
- Check "Single node"
- Databricks runtime version: choose "13.3 LTS (Scala 2.12, Spark 3.4.1)
- In Advanced Options, Spark, insert all the needed config to authorize your cluster to access the Source and Target Storages Accounts. Following is an example in our environment (should not work the same in your environment):
- Replace <your_scope> by the name of your scope storing the secret
- Replace <your_secret> by your secret's name
fs.azure.account.auth.type.bfmsampledata.dfs.core.windows.net OAuth
fs.azure.account.oauth.provider.type.bfmsampledata.dfs.core.windows.net org.apache.hadoop.fs.azurebfs.oauth2.ClientCredsTokenProvider
fs.azure.account.oauth2.client.secret.bgdatabricksdatalake1.dfs.core.windows.net
fs.azure.account.oauth.provider.type.bgdatabricksdatalake1.dfs.core.windows.net org.apache.hadoop.fs.azurebfs.oauth2.ClientCredsTokenProvider
fs.azure.account.auth.type.bgdatabricksdatalake1.dfs.core.windows.net OAuth
spark.hadoop.fs.azure.account.oauth2.client.secret
spark.hadoop.fs.azure.account.oauth2.client.endpoint <your_secret>
fs.azure.account.oauth.provider.type.bgdatabrickslandingzone1.dfs.core.windows.net org.apache.hadoop.fs.azurebfs.oauth2.ClientCredsTokenProvider
fs.azure.account.auth.type.bgdatabrickslandingzone1.dfs.core.windows.net OAuth
fs.azure.account.oauth2.client.secret.bgdatabrickslandingzone1.dfs.core.windows.net
spark.master local[*, 4]
fs.azure.account.oauth2.client.id.bfmsampledata.dfs.core.windows.net
spark.databricks.cluster.profile singleNode
spark.hadoop.fs.azure.account.oauth2.client.id
spark.hadoop.fs.azure.account.auth.type OAuth
fs.azure.account.oauth2.client.endpoint.bgdatabrickslandingzone1.dfs.core.windows.net <your_secret>
spark.hadoop.fs.azure.account.oauth.provider.type org.apache.hadoop.fs.azurebfs.oauth2.ClientCredsTokenProvider
fs.azure.account.oauth2.client.endpoint.bfmsampledata.dfs.core.windows.net <your_secret>
fs.azure.account.oauth2.client.id.bgdatabricksdatalake1.dfs.core.windows.net
fs.azure.account.oauth2.client.id.bgdatabrickslandingzone1.dfs.core.windows.net
fs.azure.account.oauth2.client.secret.bfmsampledata.dfs.core.windows.net
fs.azure.account.oauth2.client.endpoint.bgdatabricksdatalake1.dfs.core.windows.net <your_secret>
- If you want to activate the logging:
- Download the following script: log4j_init_script.sh
- Import this file in your Databricks workspace (near the artifacts folder)
- In Advanced Options, Init Scripts, select this file from your workspace:

- It is then considered on cluster bootup.
- Click on the Create compute button:
- Wait until the Cluster is available:

If you have already discovered your source data, modeled your project, and generated the artifacts, you're now ready to replace the placeholders in your generated artifacts, deploy these artifacts, and subsequently load the data based on the Generator you are using with the following possible load controls: