
Applies to
Platform: Databricks
Deploy the generated artifacts of a Databricks project with deploy.ps1. The script uploads the notebooks into a workspace folder and runs the root deployment notebook as a job on your cluster, which creates the schemas, tables and views of every layer and the load control log tables. Afterwards the solution is ready to load.
Prerequisites
- The target environment is prepared, see Databricks - Target environment with Unity Catalog or Databricks - Target environment with the Hive metastore: the cluster runs, and PowerShell 7 and the Databricks CLI are installed.
- The artifacts are generated and downloaded.
- The placeholders are replaced with the Databricks placeholder values.
Deploy the artifacts
- In the workspace, create a folder for the artifacts, for example
Artifactsin your user folder. Open it, choose the menu with three dots, then Copy URL/path and Full path: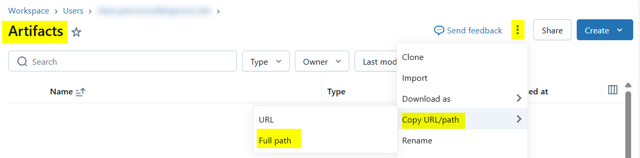
- Open PowerShell 7 in the artifacts folder, the folder that contains
deploy.ps1.With the default Deployment Options, Generate Drop Table Statements is selected. Each deployment replaces every generated table and the load control log tables, which deletes their data. This also applies when deploy.ps1 runs the deployment after the upload. Before you deploy to a target that holds data, clear Generate Drop Table Statements in Project Settings and generate the artifacts again.
- Run
.\deploy.ps1. Enter the answers to the prompts:Please specify the profile name: a name for the Databricks CLI profile, for exampledwh.
Please specify the workspace path: the path you copied, for example/Workspace/Users/<user>/Artifacts.
Please specify the cluster name: the name of the all-purpose cluster.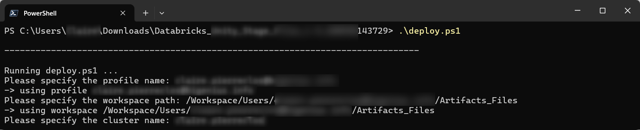
- When the profile is new or not signed in, the script runs
databricks auth login. Enter the workspace URL,https://<workspace host>, and sign in in the browser.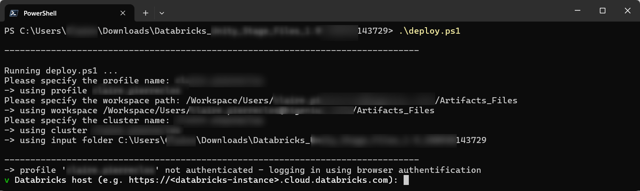
- Wait until the script prints
Deployment job run completed successfullyandFinished. It uploads each notebook, creates the job<project>_deployand reports its status every 15 seconds.
To skip the prompts, pass -ProfileName, -WorkspacePath and -ClusterName. To deploy another folder, add -ArtifactInputPath <artifacts folder>. Each run creates a new job <project>_deploy in Jobs & Pipelines.
Upload only
With -SkipDeployment, the script uploads the notebooks and asks for no cluster. Then open <project>_deploy in the workspace folder, attach the cluster and run both cells:
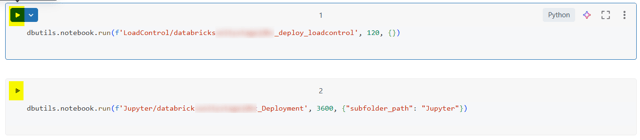
Without deploy.ps1, import the notebooks with Import in the workspace folder. Keep the folders Helpers, Jupyter and LoadControl next to the root notebook, because it calls the others by relative path.
Check the result
The deployment succeeded when deploy.ps1 ends with Finished and the log has no error rows. Query the log in a notebook, with your load control schema:
SELECT log_level, model_object_name, target_object_name, message
FROM <catalog>.<load control schema>.deployment_log
ORDER BY log_timestamp;
With the Hive metastore, name the table <database>.deployment_log instead. Each object has a row with INFO and Successfully deployed. With Unity Catalog, Catalog Explorer shows the layer schemas in the catalog:
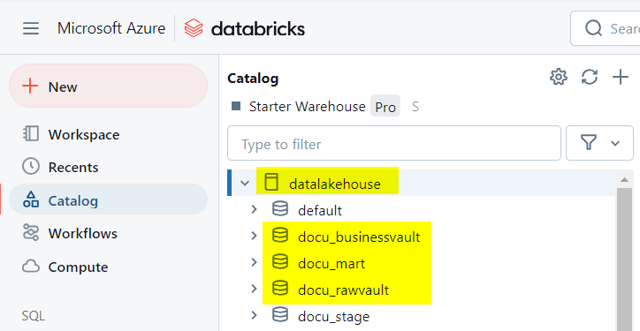
With the Hive metastore, each layer folder of the data lake holds one folder per table, each with a _delta_log folder.
Example
A deployment of a Stage Files project with the profile dwh prints, shortened:
Running deploy.ps1 ...
-> using profile dwh
-> using workspace /Workspace/Users/<user>/Artifacts
-> using cluster dwh_cluster
...
Uploading notebook ...\stageparquetdatabricks_deploy.ipynb to ...
...
Deployment notebook .../stageparquetdatabricks_deploy found
Deployment job created with id <job ID>
Deployment job run status: RUNNING. Checking again in 15 seconds...
Deployment job run status: TERMINATED - SUCCESS.
Deployment job run completed successfully
...
Finished
Redeploy and keep data
To deploy a changed project into a target that already holds data:
- In Project Settings, clear
Generate Drop Table Statementsin Deployment Options. KeepGenerate Create Schema If Not Exists Statementsselected. - Generate, download and replace the placeholders, then run
.\deploy.ps1.
The deployment then creates only the tables that do not exist yet. Existing tables keep their rows and their columns, and the log tables keep their rows. Views are replaced.
Column changes are not applied to existing tables. To change existing tables, use a delta deployment such as Databricks - Delta Deployment with Liquibase.
Move a Hive metastore database
An existing Hive metastore database keeps its location, because the deployment creates it with IF NOT EXISTS. To deploy a database to a new database_directory, drop it first, for example DROP DATABASE `rawvault` CASCADE;, then deploy.
DROP DATABASE ... CASCADE deletes every table in the database, including tables of other projects that use the same database name. With the Hive metastore, every project uses its layer names, for example stage or rawvault, as database names by default.
Failure symptoms and recovery
The deployment job run fails
Message: Deployment job run failed
Cause: A statement of a deployment notebook failed.
Fix: Query deployment_log for rows with ERROR, or open the job run <project>_deploy in Jobs & Pipelines. Correct the cause and run .\deploy.ps1 again.
A table with a UNIQUE constraint is not created
Message: [UNIQUE_CONSTRAINT_DISABLED] Unique constraint feature is disabled. in deployment_log
Cause: The cluster runs Databricks Runtime 17.3 LTS, and Use Unique Constraints adds UNIQUE constraints, for example to hubs.
Fix: Run the deployment on a cluster with Databricks Runtime 18.2 or later, for example 18 LTS. Or clear Use Unique Constraints, generate the artifacts again, replace the placeholders and run .\deploy.ps1.
The script does not find the cluster
Message: Cluster <cluster name> not found
Cause: No all-purpose cluster of the workspace has this name.
Fix: Enter the name as Compute shows it.
For failures in other steps, see Troubleshoot generation, deployment and load failures.
Release differences
Since Generator 2.0, the artifacts contain deploy.ps1. Since Generator 2.4, Use Unique Constraints is selected by default.
Manual deployment
Up to Generator 1.9, the artifacts contained no root deployment notebook. Import the notebooks manually and run Jupyter/<project>_Deployment. With Generator 1.9, run LoadControl/<project>_Deployment_LoadControl first.
Related articles
- Previous: Databricks - Target environment with Unity Catalog, Databricks - Target environment with the Hive metastore, Generate artifacts, Download generated artifacts, Replace the placeholders in the artifacts
- Next: Databricks - Load data - Native Load Control, Databricks - Load data - Apache Airflow Load Control
- Reference: Databricks - Placeholder values, Deployment Options (Project), Use Unique Constraints (Project), Notebook Deployment Objects Limit (Project)
- See also: Databricks - Artifacts, Databricks - Delta Deployment with Liquibase, Troubleshoot generation, deployment and load failures, Deploy a Project in production