
Applies to
Platform: Fabric Lakehouse
Load a deployed Fabric Lakehouse solution in Azure Synapse with the native load control by running the notebook <project>_MultithreadingLoadExecution. The notebook runs every loader notebook in dependency order, four at a time, and writes each step to the execution log. Afterwards every loader has run once with the same load timestamp.
How the load control plans and runs loads is explained in Understand Load Control. The procedure applies to Target Platform Azure Synapse; for Fabric, see Fabric Lakehouse - Load data - Native Load Control.
Prerequisites
- LoadControl Options contains
Multi-Threading Notebook, and Deploy LoadControl istrue. - The artifacts of the whole project are deployed without errors, including the load control. Deploying the artifacts of a single Dataflow Modeling View is not supported.
Load the data
- Open Synapse Studio with the Workspace web URL of the Synapse workspace and select Develop.
- Open the notebook
<project>_MultithreadingLoadExecution. - Attach the notebook to
<Spark pool>.
- Select Run all and wait until the last cell ends. It prints one line per step and ends with
tasks completed successfully.
The notebook takes the load timestamp when it starts and passes it to every loader notebook. The variable threads_amount = 4 in its second cell sets how many loaders run in parallel.
Give each project its own load control database (placeholder loadcontrol#loadcontrol#database_name). With the default Deployment Options, a project that deploys the load control into the same location replaces the logs of the other projects.
Check the result
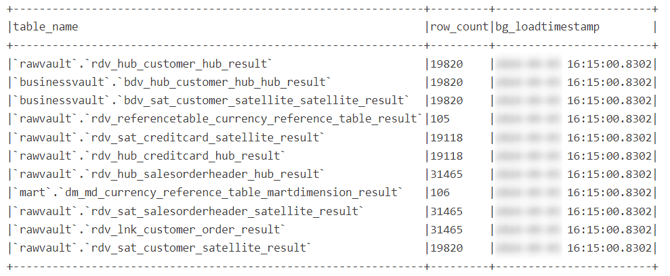
The load succeeded when the notebook ends with tasks completed successfully. To count the rows, run the notebook <project>_SelectResults. It lists each result view with its row count and newest load timestamp:
To see the steps of the last load, run this query in a notebook, with the load control database:
SELECT log_timestamp, log_level, task_name, message
FROM <database>.execution_log
WHERE load_timestamp =
      (SELECT MAX(load_timestamp) FROM <database>.execution_log)
  AND (log_level = 'ERROR' OR task_name = 'main'
       OR message IN ('finished task', 'task failed'))
ORDER BY log_timestamp;
Example
To read a result view of the Raw Vault, add a cell to a notebook with the database rawvault and a Hub named creditcard_hub:
mydf = spark.sql(
  "select * from `rawvault`.`rdv_hub_creditcard_hub_result`")
mydf.show(truncate = False)
The result view rdv_hub_<hub name>_result shows the loaded rows of the Hub rdv_hub_<hub name>.
Failure symptoms and recovery
Some loaders failed
Message: <number> tasks failed during execution. Please check the logs for more details.
Cause: A loader notebook failed. It wrote an ERROR row with the error to the execution log, and the notebook skipped all loaders that depend on it; the other loaders ran.
Fix: Read the ERROR rows with the query of Check the result. Correct the cause and run the notebook again; it runs all loaders with a new load timestamp.
For failures in other steps, see Troubleshoot generation, deployment and load failures.
Release differences
Legacy sequential notebook
Generator 1.8 also offered the LoadControl Options value Sequential Notebook, which generated LoadControl\<project>_SimpleLoadExecution.ipynb. Since Generator 1.9, Multi-Threading Notebook is the native load notebook.