This article outlines a potential setup for an environment for Apache Airflow load control.
Please note that the installation and configuration of this target environment fall outside the scope of biGENIUS support.
We will not offer assistance beyond the provided example in this article.
An Apache Airflow load control environment has numerous alternative configurations and installations.
Below is a potential environment setup for an Apache Airflow load control.
Tools
Please install the following tools:
Prerequisites
Before creating the Apache Airflow environment, please execute the following steps:
- Create the following repository structure where you want to use Airflow:

The main repository called airflow in the previous picture can be adapted to your choice. The sub-repositories must have the same names as in the picture.
- Download and copy the following files inside the main repository (airflow in this example):
- docker-compose.yaml: It is a YAML file that defines and configures all the containers to create for our Airflow environment
- For Microsoft SQL Server and Databricks, please uncomment between lines 64 to 67: the line for the connection to the target solution environment corresponding to the target technology you want to use
- .env: It defines an environment variable mandatory for the environment
- After download, the . is lost. Please rename the file .env
- requirements.txt: It defines the dependencies to add depending on the target technology
- Please uncomment the lines corresponding to the target technology you want to use
- Dockerfile: It allows the use of the requirements.txt during the container's creation
- docker-compose.yaml: It is a YAML file that defines and configures all the containers to create for our Airflow environment
- Copy the generated Python artifacts (XXX_dag.py) for Airflow load control in the dags sub-repository:

Microsoft SQL Server on Docker Target solution
If you are using Microsoft SQL Server on Docker as a Target solution, please execute the following command in PowerShell to find out the IP address to set up in Airflow:
(docker inspect training-sqlserver-2022 | ConvertFrom-Json)[0].NetworkSettings.Networks.'training-network'.IPAddressIf Microsoft SQL Server is installed locally on your laptop or in a distant server, you can find the IP address to use in the connection by executing the following command on PowerShell:
ipconfig | findstr IPv4
Update accordingly the IP address in line 65 in the docker-compose.yaml, for example:
AIRFLOW__CORE__SQL_ALCHEMY_CONN: sql+pythosmssql://sa:Admin2022!@192.168.112.8:1433/airflow
A known bug exists in the 1.9 and 1.10 Microsoft SQL Server generator dags. Double brackets are generated in the DAG code.
Workaround:
- Open the .dag file with an editor (notepad is enough)
- Find and replace all the [[ by [
- Find and replace all the ]] by ]
- Example:
- 'StoProc': '[[MS_SQL_DVDM].[RDV].[RDV_HUB_CreditCard_Hub_Loader]]'
- will be replaced by
- 'StoProc': '[MS_SQL_DVDM].[RDV].[RDV_HUB_CreditCard_Hub_Loader]'
- Use this dag in Apache Airflow
Databricks Target solution
If you are using Databricks as a Target solution, please:
- Create a Personal Access Token (PAT): https://docs.databricks.com/en/dev-tools/auth/pat.html
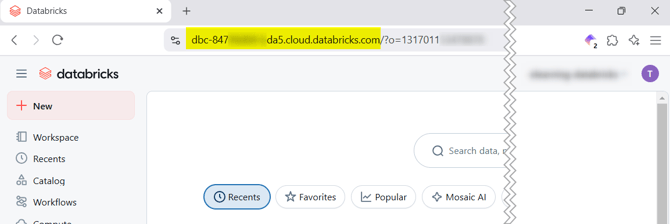
- Find your host URL:
- Databricks on Azure: this is the link used to open Databricks from Azure without the https://
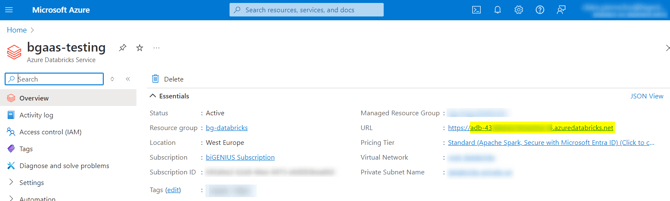
- Databricks on AWS: this is the link you are using to connect to Databricks
- Databricks on Azure: this is the link used to open Databricks from Azure without the https://
- Update the connection in the docker-compose.yaml file:
--Replace host-url by your databricks host
--Replace yourtoken by the PAT created
AIRFLOW_CONN_DATABRICKS_DEFAULT: 'databricks://:@host-url?token=yourtoken'
Snowflake Target solution
There is no special configuration.
Environment setup
To set up the Airflow environment, please execute the following steps:
- Open a Powershell in the root location of your new folder structure
- Create a network with the following command in Powershell:
docker network create training-network
If you want to use Microsoft SQL Server on Docker as a Target solution, you must create and use the same Docker network.
If you already created it, skip this step.
- Initialize the Postgres database used by the Airflow application, run database migrations, and create the first user account with the following command in Powershell:
docker compose up airflow-init
- Let’s wait for the operations to complete, and you should see the following feedback after some minutes:

- Your Postgres database is created, and credentials are as follows:
- username: airflow
- password: airflow
- Start your local Airflow instance with the following command in Powershell:
docker compose up
- When you can see the following feedback, the Airflow instance is ready:

- Navigate to the Airflow homepage http://localhost:8080

- Enter the following credentials:
- username: airflow
- password: airflow
- You should have the following result:

You can now load data with Apache Airflow.
If something goes wrong during the environment setup (you forgot to uncomment a vital line, to copy the dag at the correct location...), you should reinitialize it completely to be sure your changes will be taken care.
For this, open your Docker Desktop application and:
- Delete the airflow container:

- Delete the 5 airflow images:

- Delete the 2 airflow volumes:

Then you can restart the environment setup.